A smart house of yesterday's modern day is more than mere science fiction - this could be reached by everyone. It has ESP8266 microchip, which is the affordable yet strong device that can retrofit currently used home models and fittings with IoT functionality. In this project we will make a voice- controlled smart light with ESP8266 and Amazon's Alexa, which is a simple voice assistant.
By adding the ESP8266's WiFi capabilities and some lines of code, any lamp, ceiling light or fixture can connect to the internet and respond to voice commands. We don't need expensive smart bulbs or complex programming - the affordable ESP8266 "NodeMCU" development board allows creating an Internet of Things solution from scratch. And with Alexa's near-ubiquitous presence through Echo devices, controlling lights with our voice makes a smart home simple to use for everyone in the family.
Let's get started upgrading our home's lighting!
What is the ESP8266?
The ESP8266 is an economical WiFi enabled micro chip that has functions such as complete internet connectivity and a wide area network (WAN), which makes it a good fit for the Internet of Things. It was created by Expressif and it contains a Tensilica Xtensa LX3 microprocessor integrated with a TCP/IP protocol suite which supports 2.4 GHz WiFi. While ESP8266 is compact in size and low power consumption with low price, most official developpers and hobbyists found it very usable.
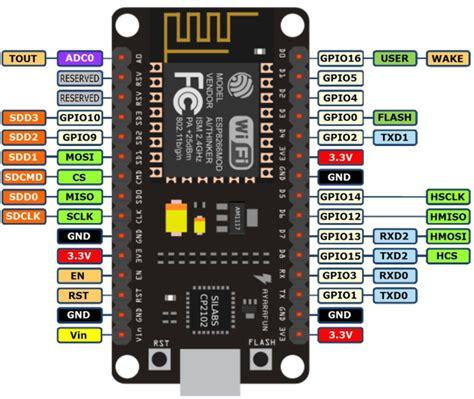
While the ESP8266 can be used standalone, the common NodeMCU development board packages the chip with pin headers for easy prototyping of IoT devices and interfaces. Using the Arduino-compatible NodeMCU board, we benefit from its on-board memory, regulators and interfaces without complex circuit design. Programs for the ESP8266 are written in Lua or C/C++ and uploaded wirelessly via USB or serial.
With built-in WiFi and a micro USB port, the ESP8266 NodeMCU provides all the connectivity we need for our voice-controlled lighting project without additional components. Its small footprint also lets us easily incorporate it into light fixtures, lamp bases or switch boxes. Overall, the power and potential of this inexpensive chip make it the perfect brain for our smart home endeavours.
Controlling Lights with an Alexa Skill
To enable voice control of our new ESP8266-powered lights, we need an Alexa skill - a voice interface created using Amazon's APIs. Skills allow third-party applications to integrate with Alexa and are built using templates and configurations uploaded to AWS Lambda.
For our lighting skill, we start with the Alexa-Specific Request Template that handles voice commands directed at our skill. We configure it to respond to phrases like "turn on the living room lights" or "set lights to 50%". Behind the scenes, the skill will send HTTP requests containing these voice commands to our ESP8266 devices.
To connect the skill to our hardware, we define an HTTPS endpoint hosted on the NodeMCU boards. When a request comes in, the ESP8266 will parse the command and toggle or dim the connected lights accordingly. This two-way communication between Alexa and our hardware brings voice control to physical devices in the home.
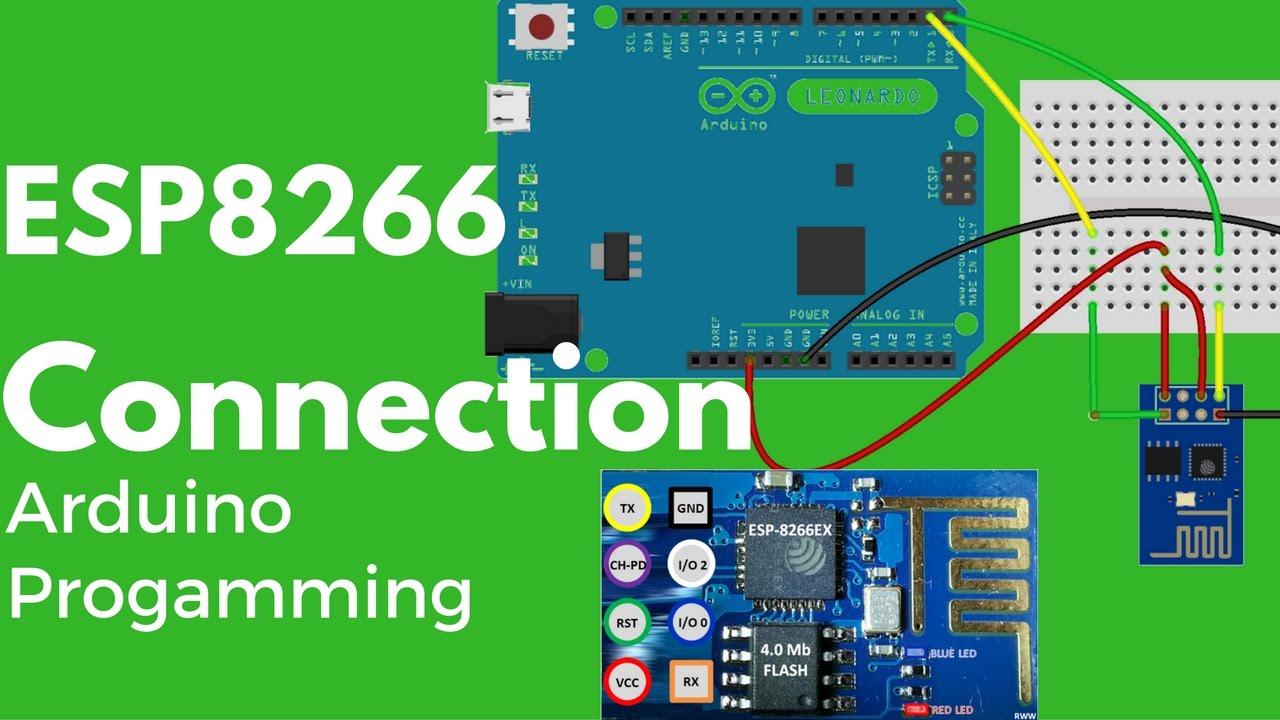
Building the ESP8266 Circuit
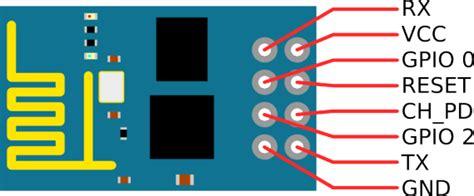
Now that we have Alexa listening for commands, it's time to build the ESP8266 circuit that will interface with lights. For a simple setup, connect the NodeMCU pins as follows:
- VIN (3.3V) to power the board
- GPIO0 to GND (reset pin)
- GPIO2 to resistor to relay input
- Relay output to lamp power
This uses a transistor/relay module to switch AC lamp power on/off via GPIO2. We could also control LED strips or low-voltage fixtures directly with a MOSFET. Software PWM on GPIO2 allows for dimming capabilities as well.
After wiring, connect the ESP8266 to a 5V USB power supply. The board will boot and be available over WiFi once programming is complete. This basic circuit forms the core of our smart lighting that can now be remotely controlled and automated.
Components Free Worldwide Shipping
Programming the ESP8266 with Arduino IDE
To roll the source code to the NodeMCU board we'll use Arduino IDE with EPS8266 support We need to have the first ESP8266 board package installed and connect the board via USB this way. Scan the Tools menu and choose the preferred Module for the job.
Our code contains functions to:
- Initialize WiFi connection
- Handle incoming HTTP requests from Alexa
- Toggle or dim the light accordingly
- Return status responses
When a request comes in, it parses the command string to determine the action. A simple if/else checks for commands like "on", "off", dim levels etc, then sets the relay or PWM pin appropriately.
This allows the ESP8266 to act as a web server, listening for and responding to Alexa's commands. We include debug messages to the serial monitor for testing. Once uploaded, the board is ready for Alexa integration!
Testing with IFTTT Webhooks
Before setting up the full Alexa skill, ifttt (if this then that) provides a quick way to test our ESP8266 is responding correctly to web requests.
In ifttt, we create an applet with a webhook trigger for requests to our ESP8266 IP. The action sends a test payload when ifttt receives a POST. Our ESP8266 code checks for ifttt's identify headers and performs actions like turning on the light.
With ifttt verifying the requests are reaching our board, we know the hardware and code work before connecting to Alexa. This iterative approach helps troubleshoot any wiring or programming issues. With ifttt successfully triggering our light, we're ready for the next step.
Creating the Alexa Smart Home Skill
Now it's time to register our skill with Amazon and enable voice control through Alexa. We head to the Alexa Developer Console and select "Add a New Skill".
On the smart home tab, we upload our configuration defining Report and Execute APIs. Report requests like "what's the light status" return current state while Execute like "turn on light" trigger actions. Our skill ID links it to our ESP8266 through a common endpoint.
With AWS Lambda, we define functions mapping Alexa intents like TurnOnOffLight to our ESP8266 requests. During beta testing, ifttt can still handle the Execute API while fine-tuning interactions. Once complete, submissions are reviewed and our skill is live!
Users simply need to enable our skill through the Alexa app for integration. After linking accounts, phrases like "Alexa, turn on living room lights" remotely control the ESP8266 circuit from any Echo device. Our voice-enabled smart home is now fully realized!
Expanding Possibilities with ESPHome
While our initial project focused on basic on/off control, ESPHome takes our lighting to the next level. This open-source firmware provides an easier, more powerful alternative to coding directly on the ESP8266.
ESPHome automates much of the setup process. It generates configuration files we simply place on the ESP8266. Options like OTA updates, custom components,variable types and enhanced features are all supported out of the box.
Under ESPHome, our light acts as multiple virtual devices. Brightness can be controlled as a separate switch or slider in the Alexa app. Additional state values for energy or color monitoring become available too. Automations based on time, sun triggers or other conditions bring new functionalities.
Third party integrations through Home Assistant further expands what's possible. Presence detection using motion sensors could trigger automations. Our ESP8266 light becomes part of a holistic smart home ecosystem controlled from any device. The board's flexibility combined with tools like ESPHome means we’ve just scratched the surface of its capabilities!
Final Thoughts
By combining an inexpensive ESP8266, Alexa skills and some code, we ushered a non-smart light into the modern connected home. Basic circuits became a versatile smart lighting system with robust voice control. Building from the fundamentals up also gave deeper understanding of how IoT devices connect and operate behind the scenes.
Looking ahead, possibilities continue growing as new standards and technologies emerge. Matter integration will simplify device management across smart platforms. Thread and Bluetooth mesh offer improved connectivity at even lower prices. More powerful microcontrollers like the ESP32 expand what small devices can accomplish as well.
Whatever the next evolution may bring, the open nature of tools like Arduino and ESPHome ensure our creations remain updatable and compatible. With each new project, our understanding and skills multiply too. Before long, every appliance in the home joins the revolution thanks to companies supporting hacker innovation through accessible chips like the lowly but powerful ESP8266. The future of smart everything starts here.
Enhancing the User Experience with Home Assistant
While the Alexa skill allows basic speech control, integrating our ESP8266 lighting with Home Assistant truly transforms the user experience. Home Assistant is an open-source home automation platform that connects all smart devices together into an elegant central interface.
To add our light to Home Assistant, we install ESPHome and configure it to expose our device as a 'switch' entity. When Home Assistant discovers it on the network, the switch automatically appears in the interface for control. This "discovery" process handles all of the connection details behind-the-scenes.
Within the Home Assistant, we can now easily monitor and control the light. Its state remains in sync across all clients for a unified experience whether on a tablet, phone or voice assistant. Users see the light listed along with other switches to toggle on/off with a tap.
Additional benefits emerge as well. We can set the ESP8266 switch to also control a "dummy switch" in Home Assistant that acts as the parent entity. Now phrases like "toggle all lights" encompass our device along with traditional bulbs for seamless whole-home voice control.
Animations further improve the interface. Toggling the light switch slides smoothly between states with fade transitions, providing satisfying user feedback. We develop these custom Lovelace cards and UI themes directly in Home Assistant for a polished finished look.
Richer control surfaces emerge too. A brightness slider or color picker exposes ESP32 PWM and Neopixel LED capabilities. Conditional formatting alters card styling based on sensed states like "lights off when sun rises". Automations run specific actions under certain schedules or triggers.
For example, our ESP8266 switch could trigger Philips Hue lights to slowlybrighten 30 minutes before sunrise, simulating a natural waking ambient glow versus harsh on/off. As another stays on only when motion is detected for energy savings. Possibilities are endless through these integrations.
Taking things a step further, presence detection relays occupancy to Home Assistant from Google Home's activity recognition. When no one's home, all lights shut off for absence to enhance security appearance. Return notices turn some accent lights back on with a warm welcome each evening.
Additional Information
These are just a sampling of how Home Assistant elevates our ESP8266 project beyond a simple device. Deeper details worth exploring include:
- Alexa Media Player integration streams playlists when lights activate, tying automation into entertainment
- Managing access via user accounts allows family members control tailored to their needs
- advanced MQTT support pushes live telemetry from ESP8266 for energy monitoring, automation conditions
- hardware expansion adds PIR, temperature/humidity sensors communicated over MQTT
- Thematic Lovelace UI designs styled for different rooms create a cohesive smart home aesthetic
- blueprint sharing automates configuration replication to add similar devices throughout the home
- Deep integrations expose ESPHome as native components to control systems like Vivint, ADT allowing pro-level security
- scheduled backups maintain configuration safely in case of hardware failure for reliability
- remote access via DuckDNS, VPN lets control when away from local network
The flexibility of Home Assistant presents our humble ESP8266 light as a fully-empowered node within a sophisticated smart home ecosystem. Its potential seems limitless given support from a thriving open-source community constantly evolving new capabilities.
Expanding Hardware Options
Beyond the basic functionality demonstrated, many ESP8266 variants expand the board's practical applications. Here are some other great MCU options to consider:
ESP32 - More powerful than ESP8266, this chip supports Bluetooth/BLE, deeper integrations, and on-device ML inference through its dual core processor and coprocessor. Great for embedded projects.
WeMos D1 Mini - Similar footprint to NodeMCU but with on-board lipo charging circuitry, making it ideal for battery-powered wireless sensors.
TTGO T-Watch - Integrated OLED and buttons allow creating basic 'smartwatches' and wearables using ArduinoIDE code.
Huzzah32 - Feather-form factor makes this ESP32 board perfect for craft and wearable projects needing portability.
ESP-01/07 - Tiny ESP8266 modules great for hiding in devices as a “secret ESP agent” due to small size.
ESP-WROVER - More memory and advanced capabilities for complex IoT solutions like ML or computer vision applications.
With so many great ESP variants available, sky's the limit on projects we can develop! Tinkering combines the right board's strengths with our imagination. In future installments, we'll explore novel uses for some alternative ESP hardware options.
Expanding Possibilities with Integrated Displays
While our initial lighting project utilized basic on/off control, adding a small display opens up new interactive elements. Boards like the TTGO T-Display or ESP32-S2 Saola integrate an OLED or E-ink panel, providing a way to show additional device information or offer controls beyond simple switches.
Some display enhancement ideas include:
- Current brightness level shown as a slider bar for at-a-glance feedback on settings. Touch inputs adjust output just like a smartphone.
- Schedule future light actions on the display like "turn off in 1 hour". Touch edits times or cancels pending operations.
- Energy usage statistics graph daily kWh for eco-conscious optimization of settings over time.
- Color temperature adjustment offers a palette of white light hues from warm 2700K to cool 6500K with preview.
- Multi-scene support stores groups of device states as presets to activate scenes for different activities. "Movie Night" dims light and closes blinds for example.
- If motion is detected, the screen can display a greeting or warning message rather than fully powering lamps to avoid startling.
- Overlays provide notifications for package deliveries or reminders pulled from a cloud calendar directly on the light.
The additional real estate simplifies complex controls that may not transition well to vocal interfaces alone. Touch targeting also helps accessibility. Combined with ESPHome's flexibility, interface possibilities are vastly expanded through an integrated screen.
Improving Connectivity with Bluetooth & Thread
So far we've relied on WiFi for all communication. But sometimes a direct short-range wireless option independent of home routers is preferable - that's where Bluetooth and Thread shine.
The ESP32 supports both protocols out of the box using its integrated radio hardware. Thread in particular promises robust yet power efficient mesh networking ideal for large sensor deployments with its open specifications.
Some use cases benefiting from these alternative wireless standards include:
- Key fob remote activates lights from outside before entering through a Bluetooth button press.
- Thread gang switches daisy chain together without WiFi for continuous operation if internet drops.
- Multi-room audio playback synchronizes Light Show effects across Thread bulbs without lag.
- BLE keycards trigger automated welcome sequences on approach like "good morning!" texts.
- Battery-powered BLE motion sensors report to a Thread Border Router that forwards readings over WiFi.
- BLE beacons stream localized audio content to mobile devices within range for interactive exhibits.
By adding short-range wireless, we gain autonomy plus interesting interaction models beyond a tethered network. Protocols like Bluetooth also pair nicely with companion apps for convenient remote control on phones.
Building Custom Electrical Components
For some projects, standard electrical modules may not provide the necessary functionality or form factor required. In these cases, developing custom circuit boards expands opportunities even further.
Some bespoke component ideas include:
- Addressable LED ribbon controller that cleanly integrates data and power connections.
- Circuit-switch pane for whole-home lighting scenarios like "evening" with single button press.
- Wireless wall dimmer that attaches directly behind standard switches without rewiring.
- Filament bulb replacement incorporates WiFi/sensor while keeping vintage aesthetic and socket fitting.
- Addressable EL wire driver for programmable accent lighting along baseboards or furniture.
For simple circuits, stripboard or perfboard work well. More complex designs leverage autoplace-and-route EDA software. Common components as ICs, passives and connectors populate homemade boards through reflow soldering.
The finished units integrate seamlessly as if made for purpose while unlocking previously impossible embedded builds. With basic PCB skills, limitless customized interfaces become feasible tailored precisely as needed.
Adding Sensors for Automation & Detection
To take our smart lighting beyond simple on/off, environmental sensors provide valuable input to enable new functionalities and automation. Some sensor ideas include:
- PIR motion detects activity and adjusts light intensity automatically for energy conservation.
- Light level monitors maintain constant illumination independent of outdoor conditions.
- Contact sensors know when doors/windows open to dim lights for improved security feedback.
- Temperature/humidity gauges optimize white color temperature for perceived brightness at different conditions.
- Noise detectors activate lights gradually for nighttime trips to the bathroom without startling sleepers.
- Air quality monitors flag necessity to ventilate by changing light color when particulates rise above safe levels.
- Presence tracking through Bluetooth ensures lights aren't left on unintentionally when home is empty.
Sensors communicate wirelessly over MQTT, exposing additional state values. ESPHome then applies rules like "turn off in 30 minutes if no motion detected". Integrated detection moves devices beyond simple controls towards true "smart" behavior.
Comment